top of page

Kingsley Passivhaus
The first retrofit Passivhaus building in the North of England
The Project
Planning
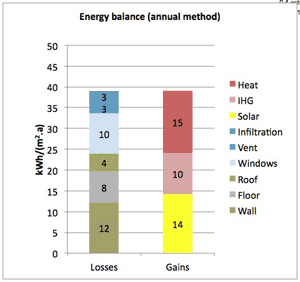
The house upgrade was designed by Architect Gil Shalom with the help of a sophisticated program called Passivhaus Planning Package. This calculates the energy the house will use for heating and shows how alterations in the design
and materials will impact the overall performance.
To start...
The floor was taken up, dug out and replaced with a concrete slab with 30cm of insulation below. The inner walls were underpinned with thermal blocks. Some walls and two internal chimneys were removed, and brackets added to support the stack in the loft.
Next, The Roof
The roof was stripped and insulation boards were
fixed above the rafters, with counterbattens and
breathable membrane on top, before the
battens, tiles and solar panels were replaced. Sheeps
wool insulation was fitted between and below the rafters. Extra glulam timbers and joists were added to the loft to make a new room in the roof with a small bathroom.


Airtightness
Possibly the hardest job! Plaster was removed from all exterior walls and wiring was chased into the brickwork. Special airtightness tapes were used to seal round all rafters, pipes and windows before replastering to complete a continuous airtight layer around the whole house. Airtightness tests were performed at two stages showing that the building had been made 20x more airtight than current building regulations.
Ventilation
Now airtight, controlled airflow could be added back to the building in the form of heat recovery ventilation. Ducting was run round the house to supply fresh air warmed by the heat recovered from air extracted from bathrooms and the kitchen. The Paul MVHR unit installed operates at 94% efficiency and uses only 20watts.


Windows
Windows and doors were replaced with triple glazed, tilt and turn, high performance units from The Green Building Store. These have very high insulating, argon-filled panels, double seals and coated glass that maximises solar gain whilst reducing heatloss. They were hung outside the masonry walls to reduce thermal bridging from the cold bricks.
Finally.....
20cm of External Wall Insulation was attached to the outside walls down to the foundations and up to meet the roof insulation boards to complete 360 degrees of insulation of the house. This was then rendered with a three part cement-based render system.
bottom of page